Explaining the geometry of a twist drill via the internet is a bit like describing a spiral staircase in unambiguous Patagonian prose. I therefore take refuge in a sketch or even a series of sketches. But before getting down to business let us consider at least the sensible parts of health and safety. Wear safety glasses or goggles and if wearing magnifying goggles when sharpening the smaller sizes do remember that you have them on. Many years ago I was doing some very small work in a largish lathe and had a watchmakers eyeglass in my right eye. I leant forward to bring the work in focus and brought my nose firmly in contact with the revolving chuck. The resultant blood quite spoiled the work. Do be careful.
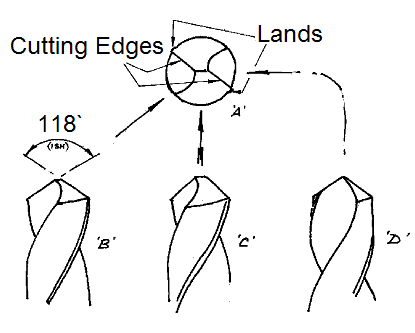
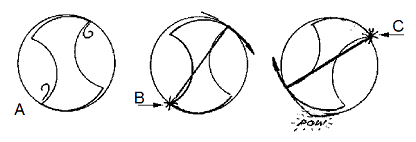
The first sketch shows several views of a typical twist drill. Just a few things of note, mainly so that I can refer to them later without having to make explanations. A twist drill has spiral grooves or flutes running along its working length. Looking at the end view `A`, the shape of the flute is such that the cutting edges are straight. Between the inner ends of the cutting edges is the web of the drill and running along the length of the drill just behind the outer ends of the cutting edges are the lands. In view `B` we are looking at right angles to the cutting edges and the included angle of the point. This is traditionally given as 118 degrees but I have no idea why! 120 degrees cuts just as well and indeed a slightly blunter point is often used for hard materials. View `C` shows the body of the drill with the cutting face sloping upward to the cutting edge, it also shows the ridge along the top of the web. View `D` looking at the end of the ridge is the only view where the end of the drill appears pointed.
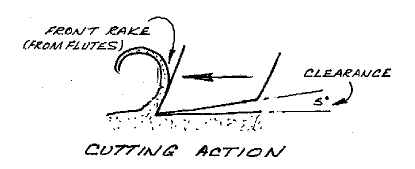
When a drill is cutting, the material nearest the centre of the drill is literally pushed or smeared aside by the ridge at the end of the web until it comes within the sweep of the cutting edges. The cutting edges are shown in action in my second sketch. We will return to this later when considering modified profiles. For the moment we are solely concerned with the clearance angle behind the cutting edge. We shall try to make this about 5 degrees. Unfortunately when wrapped around a drill this produces a drill face in the form of an eccentric inclined cone so rather than waste a lot of time on the geometry let us just sharpen the drill.
Apologies to those who are expecting some high tech stuff here but we are in the business of making models not seeking toolmaking perfection
Sharpening the drill.
This is an art which some learn readily, others never seem to master. ( I could never learn to roller skate nor do any of those slippy slidy winter things.) I will attempt to explain and then show the easy alternative.
With the grindstone switched off, present the cutting edge of the drill to the side of the stone so that looking down on the drill it is in position `B` of the introductory sketch. and the cutting edge is horizontal against the stone. The cutting edge is tilted upward at 5 degrees. This is the starting position so spend a moment or two getting used to it. Teach your fingers to return to this position instinctively. Hopefully the sketch will make things clear. I usually balance the leading edge on a finger and hold the back of the drill in the right hand. Now look at the sketch of the finish position. Without letting go of the drill, rest the drill against the stone and get your fingers used to this new position.

You will find that it requires three movements at once to go from the start to the finish position! When you have got the feel of it take an old drill about 3/8inch (10mm) dia., switch on the grindstone and give it a try. Do not try to remove great amounts of metal, the object of the exercise is to renew the cutting edge and remove just enough material behind the cutting edge to enable the edge to do its job. Repeat for the other cutting edge. Hold the drill up to the light in position `B`.
Does the point look symmetrical? If the drill is held so that it is seen in silhouette and the eye is not distracted by the flutes, the Mk 1 eyeball is amazingly accurate. If all this seems airy -fairy and inexact I can only plead that once learnt it is quick and near enough for most of our work. I am lazy and would probably persist with a dull drill rather than set up a complex drill sharpening rig. Perfection may be an end in itself but engineering is the art of the near enough.
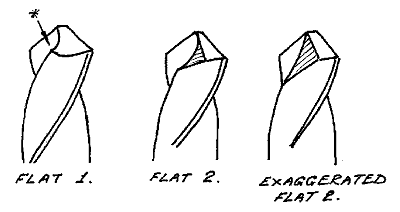
Two flat
sharpening.
This is simple,does the job just as well and is easily learnt! So why do we bother with the foregoing rigmarole?
I think that the craftsman who learnt to sharpen drills that way would lay claim to a certain mystique not given to common mortals !
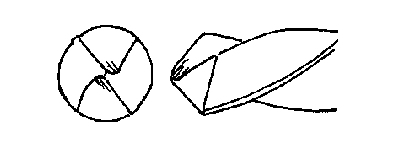
Hold the drill in the start position as per sketch. Lightly touch the cutting edge to the grindstone. Look at the side of the drill. The front portion of the cutting edge is fine but the rear edge curves forward again. Not much use. See sketch. But if the drill is held in the finish position and again touched to the stone a second flat will appear and remove the re-curved back edge. Job done. Not elegant but effective. A set of cheap drills given to me recently are all sharpened this way but with an exaggerated angle on the second flat. They work but with an increased tendency to chatter until sufficient depth is reached for the steadying effect of the body of the drill to take effect.
Before we get into the subject of modified points let us recap on the cutting action of the drill. The blunt ridge at the end of the web in the centre of the drill smears the metal outward into the area swept by the cutting edges. Thus there are two totally different cutting actions, the smearing action at the centre which cannot dig in and the cutting action of the edges themselves which can. The balance of the two actions is not too critical and for most applications the twist drill provides the right proportions. Most of the time! When a drill misbehaves it is usually because we have upset the balance between the steadying action of the web and the dig in prone cutting edges.
Chatter
A. Normal cutting
B. Tool digs in here and stops moving. Tool then pivots about this point. The other cutting edge swings ever deeper into the work until---
C. It digs in more deeply than the first time. Dig one breaks out. Swinging about the new dig the first edge heads for a new grave.
In my little diagram I have attempted to show the chatter process. The important thing is that this can only occur at the cutting edges, the web smeary bit (hereafter called the ridge) is totally immune and actually has a steadying influence on the drill. Thus it is that when the drill breaks through thin sheet it removes the ridge area first and freed of its restraining influence goes into chatter mode.
If drilling big holes in thin metal try drilling a piece of scrap first. If it chatters fold up a pad of paper about 20mm sq. and about eight layers thick and put under the point of the drill. Keep the pilot hole fairly small and let the pad rotate with the drill. Not infallible but usually has enough of a steadying influence------- back to subject!
A similar action may occur when opening up an oversized pilot hole. With no steadying influence from the ridge the drill goes into chat mode and produces an interesting oversize hole with a slow helical pattern in it. More on that later It can also occur when an oversized centre drill has been used before drilling in the lathe. The drill chatters about and produces an awful hole until the end of the pilot is reached.
Thinning the Point
Having extolled the virtues of the ridge, let us look at the downside. It depends on considerable local pressure being applied to the point of the drill. If the drill is large the force required may be beyond the capacity of the drilling machine. In this case the point may be thinned, so extending the cutting edges inward. See sketch.
Using the corner of the wheel the flute area is extended forward locally in the shaded area. Tip for the idle, this modification can seriously reduce the amount of push required when drilling with a pistol drill. Such thinning of the point is often beneficial when drilling materials such as drawn bronze or stainless steel where there is a tendency for the material to work harden.
Dropping the speed should be the first option however!
Straight Flutes for Brass

For some materials, notably brass, the straight flute drill is a better option. The twist drill has a tendency to dig in and grab due to its excessive front rake.
But we have lots of twist drills and straight flutes are expensive. The answer is to take a hand stone and just give the edge a couple of strokes parallel with the axis of the drill. See sketch (left). Do not go mad and overdo it. The cutting edge will not care how small the flat is !
For the economically minded a small flat gives the option of later re-sharpening to standard form, per contra a touch with a stone in this fashion can often restore a tired drill.
A few last points.
All a bit obvious really. A large drill will not start accurately from a tiny centre pop. When one considers the ridge shape and its action it is a wonder that there is any relationship between centre pop and drill position at all! Use a smaller drill with a diameter of around half to three quarters of the web thickness of the big drill to put in a short pilot hole and help it start in the right place. On really big drills the pilot drill may need a pilot A full depth pilot hole is even better. Diameter as above will reduce the effort needed to push that ridge area into the metal while retaining enough support to stop it chattering.
Incidentally the parallel shanks of large high speed steel drills are usually soft and can be turned down to suit ones chuck. I have a collection of big old drills from the car boot sale which have been cut down with the angle grinder, resharpened, shank reduced etc for use on the Myford.
Counterbore
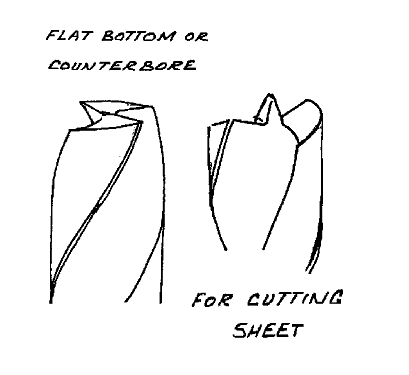
Twist drills can be sharpened as in the sketch for drilling flat bottomed counterbores. Use an ordinary drill of the same size to remove the majority of the material and finish with the flat bottomed one. In the absence of a ridge area it depends on the wall of the hole to keep it on course. Sharpen against the corner of the stone.
A drill sharpened in a manner similar to the special twist drills for wood (see sketch) can be used for cutting holes in sheet. The action is rather like that of a fly cutter. Put in a pilot hole and cut about halfway through the sheet, turn over and complete the cut. Sharpen against the corner of the stone. It may be worth blunting the corners of the centre portion to improve stability.
Safety Note. when drilling large holes in sheet clamp the work. Don`t hold it in your hand.
Small Drills
Small drills can be difficult to sharpen on the grindstone, mainly because ones hands prevent one seeing what is going on and also because the rate of metal removal is so fast that by the time vision is established one has gone too far! As usual, when faced with a difficulty I give up and do something different.
If the drill is held vertically in the left hand and a mini power drill armed with a small stone is held penholder fashion in the right it is a much simpler job. The sketch shows what I mean. If the wrists can rest against something it is easier still. Note that the sparks etc are conveniently directed away from the operator.
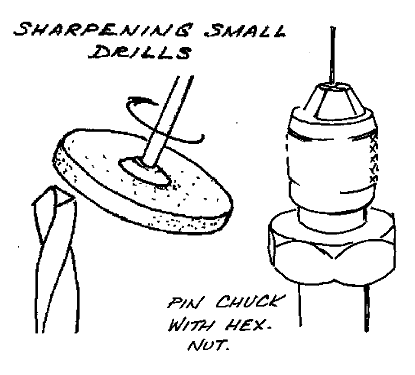
Even smaller drills below 1.5 mm are a pain. mainly because the cutting edges are difficult to see when sharpening and one is increasingly dependent on faith.. This is where the final weapon in the armoury comes in. A pin chuck with a hex. nut secured to the body. Sketch. If the drill is held vertically in this and the position of the nut/chuck noted when the cutting edge is in a convenient position it is a simple matter to rotate it through 180 degrees to get the second edge into a similar position. Application of the mini power drill or a hand held slip stone soon restores the edge.