Simple Press Tools for the home workshop
The press tool simply consists of two pieces of metal or other material between which the workpiece is placed and pressed into shape. The female part is usually called the die and the other part the punch. Fig. 1 illustrates the parts of a simple piercing tool and shows, in addition to the punch and die, the other two essential components.
These are a guide to ensure that the punch is accurately centred over the die aperture and a stripper for removing the work from the punch. All piercing tools have these four elements either separately or in combinations even when the stripper is only the operators fingers. Turning from the theoretical to the practical, the first tool to be considered is a very neat unit which Trevor Wilkinson of Crawley was kind enough to show me.
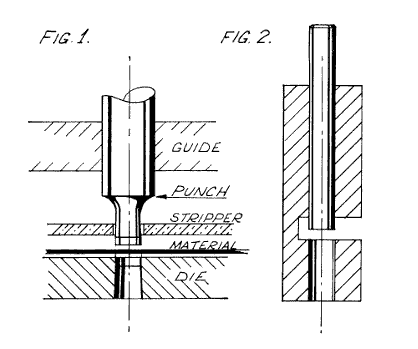
It was intended to produce small circular blanks and is shown in Fig. 2. It consists of a piece of silver steel with a drilled and reamed hole through the centre which has a saw cut or notch cut almost through it. (Fig. 2). This forms in one piece the die, guide and stripper. The punch is formed of a second piece of silver steel which is a sliding fit in the first.
The material is placed in the saw cut, the punch inserted in the upper hole and given a sharp tap with a hammer. The punch is withdrawn, the material moved on and the process repeated.
Locomotive headboards or metallic confetti can be produced in profusion but it is difficult to extend this construction to pierce other than round holes.
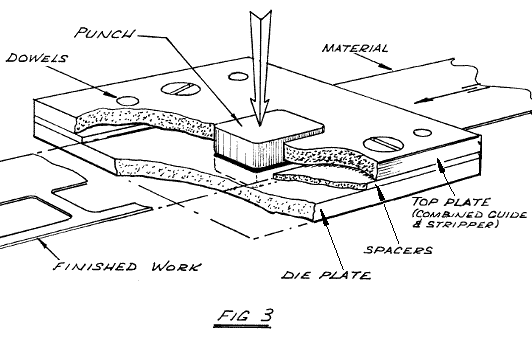
To tackle more complicated shapes we need to consider a built-up die and stripper assembly as in Fig. 3. The die itself is a piece of gauge plate in which a hole of the appropriate shape is cut. This shape is repeated through the mild steel stripper which acts as a guide to the punch. And now the problem begins; the punch must be a close fit in the die, not just here and there but all around the cutting edge.
The clearance between the punch and die for the thicknesses of metal with which we work should be approx. 0-001 in. Don`t be alarmed! This is not as difficult to achieve as one might think, if the following procedure is employed.
First file out the shape of the punch from gauge plate as in Fig. 4.
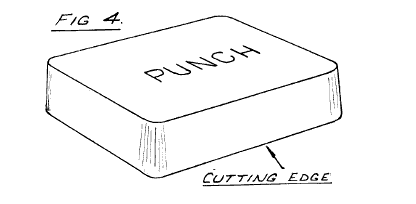
The edges should be given a slight but definite taper as shown. The plate is then hardened and tempered and the cutting face rubbed lightly across an oilstone to give a good sharp edge. The die and stripper assembly is then made up and dowel pins (pieces of silver steel) inserted to enable it to be stripped and assembled accurately.
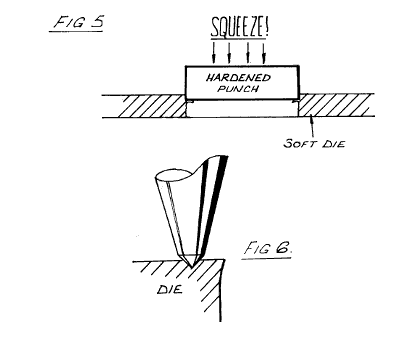
The aperture in the stripper plate is carefully marked out and filed to shape leaving it just a fraction undersize. The hardened punch is then placed in position over the half finished hole and the whole lot squeezed in the vice. If the hole is only slightly under the size of the punch, the punch will impress its shape into the softer metal of the stripper (Fig. 5), and it is then an easy matter to file away most of the obstructing metal and try again.
Each time this is done the punch will shear its way further into the stripper until, at last, it will go right through. Very gentle touches with the file and constant examination of the assembled punch and stripper will soon achieve a nice sliding fit. Over enthusiastic use of the file resulting in a sloppy fit can often be corrected by closing up the edge of the stripper with a centre punch, Fig. 6.
The die may now be tackled. The die aperture can be marked out by assembling the stripper directly to the die without the intermediate packing piece, filing it up just undersize and then squeezing the die into it through the stripper. in this case, however, the die does not have to be squeezed right through. As soon as it has gone through the first sixteenth of an inch of the die plate it can be backed off or tapered away from the hole.
The die is now hardened and tempered and the die tried in place. It promptly fails to fit! But don`t worry, for this is caused by the distortion of the die plate during hardening, the amount of which is very small and the easiest way of dealing with it is to gently stone the sides of the punch until a fit is achieved.
Another way of dealing with the distortion problem is to leave the die unhardened, but this reduces the number of parts that can be made from it— say, from five thousand to two hundred.
The die spacer and stripper can now be reassembled and the punch once again tried for size. If all is well, place a piece of your chosen material in the gap, put the punch in the stripper and squeeze the whole lot in the vice. The result should be a cleanly punched aperture. If there should be an unacceptable burr on the punched edge the punch is too loose a fit in the die. There is no easy cure for this short of remaking either punch or die. All is not lost however, as we can usually use a harder grade of material for our workpiece. Hard brass or nickel silver is far easier to pierce successfully than the very soft variety.
I apologies in advance to those highly skilled tool makers whose sensibilities are offended by Bodger Binnies
approach to the craft of toolmaking, but I have yet to see the factory where at least a couple of press tools on the rack did not bear signs of having had the edge of the die peened up.
Clapper Tool
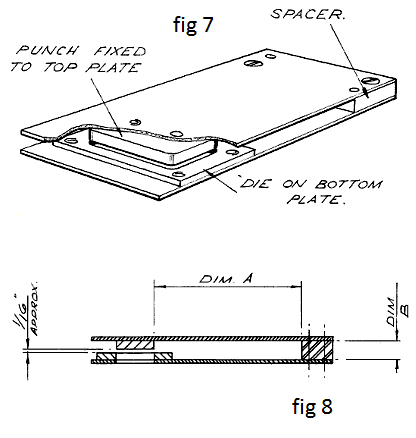
A further variant upon the press tool theme is the `clapper tool`. This consists, as is shown in Fig.7, of a top and bottom plate of comparatively thin metal held apart at one end by a spacer. The top plate carries the punch and the bottom plate carries the die. In use the work piece is placed between the punch and die and the whole assembly squeezed in the vice causing the thin top and bottom plates to flex, forcing the punch through the work into the die.
If the spacer block is screwed and dowelled between the top and bottom plates so that the tool can be stripped down during construction it will be found a very simple tool to make. A dissertation upon the construction of such a tool would seem to be in order, so here we go.
As mentioned above, the first thing to do is to make up the top and bottom plates. These should be about 16 swg (1/16 inch. or 1.5 mm) thick and proportioned so that the distance between the edge of the spacer and the edge of the punch is three inches at least. (Dimension `A`- Fig. 8)
If the punch is small, or a number of punches are being used in a multiple tool then they should be backed up by a local stiffening plate in the punch area. If this is done it is essential that the punches are moved further away from the spacer so that the width of the flexible strip between the spacer and the edge of the stiffener is maintained. (Dimension `A` again.)
The spacer, which is merely a strip of metal of suitable thickness, is then screwed and dowelled between the plates. The thickness of the spacer (Dimension B of Fig.8) is determined by the thickness of the punch and die plus any backing plates that may be needed. The essential point is that there should be approximately 1/16 inch. clearance over the top of the material to be punched when the tool is at rest.
The top and bottom plates are assembled to the spacer, the edges of the plates filed up neatly to size and the plates marked so that they can be stripped and reassembled in the same order.
The punch and die can now be made up as before, with the exception that this time both the punch and die must have countersunk holes for securing them in position put in before they are hardened. l know that`s obvious, but just wait till you have a hardened punch and die with no holes in them and see if you think so then. Make sure they are countersunk on the right side too!
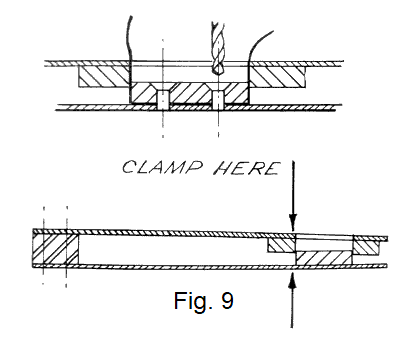
Clamp the die in place on the bottom plate and drill the fixing holes through the plate. Mark out the die aperture on the bottom plate, remove the die and make a hole through the bottom plate slightly larger than the die aperture. Secure die and bottom plate together. Assemble the spacer and top plate to the bottom plate.
Put a clamp on the open end of the assembly (Fig. 9) and squeeze together until the punch, when placed in the die aperture does not fall right through. Now lay a couple of strips of paper across the die aperture to take up the punch/die clearance, put the punch in the aperture and drill through the punch fixing holes into the top plate.
Screw or rivet the punch into place, remove the clamp and the paper strips and check that the punch does enter the die when the assembly is squeezed gently in the vice.
So much for the basic tool but we should have a stripper to remove the work from the punch. This may be of the type described previously, or may take the form of a rubber pad.
This is a very simple and effective form of stripper and consists merely of a piece of fairly hard rubber with a hole cut to fit around the punch closely and which projects beyond the face of the punch by approximately 1/32 inch. It is best secured to the top plate by an impact adhesive.
The subject of press tools is large and some tools are very complex indeed but I have no intention of giving a full professional treatment of the subject here. However I would just like to indicate the way in which some of the more complex tools work.
Any complex press tool is, in fact, an assembly of simple ones in which the work is moved forward a set distance so that a given part is acted upon successively by each tool.
A typical example is shown diagrammatically in Fig. 10 which is a tool for knocking out sleeper strip. The first bite through the 1/32 inch. thick marine plywood just outlines the first sleeper and pierces the four holes; the strip is then eased forward over the stop, drawn back against it and the blow repeated, this punches out the gap between the sleepers and puts in the next four holes. The process is repeated as fast as the strip can be moved.
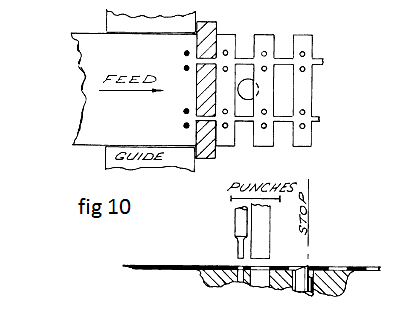
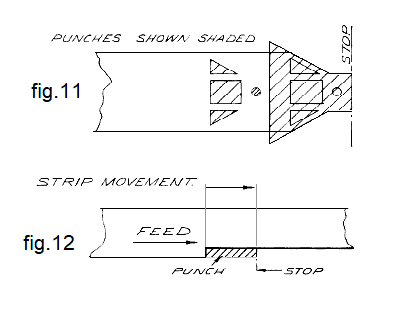
For wagon or coach w/irons the holes are put in first and the outer profile follows. There are several ways of locating the strip as it moves forward, the hook type where the strip is pushed forward over the sloping back of the stop and pulled back so that the stop engages in the edge of an aperture has already been shown in the sleeper strip. Similarly, the use of an end stop is shown in the `W` iron example (Fig.11.)
There is one other type of indexing location worth considering for our purposes and this is the edge notching location shown in Fig.12. Each time the tool is operated, a piece is removed from the side of the strip allowing the strip to move forward again when the tool is released.
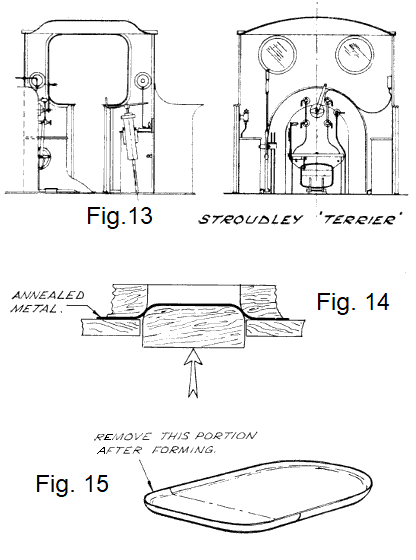
We have discussed the piercing and blanking type of press tool sufficiently, so I would like to move to simple tools for drawing the metal. As an example of what I mean, consider a Stroudley cab roof. For those ignorant and misguided readers who do not realise that all that is worthwhile in railway engineering took place at Brighton before 1889, I give a drawing of that magnificent cab, Fig.13. Re-reading the foregoing I suspect I may be accused of prejudice, but did anyone but Stroudley realise that a cab roof like the one illustrated would not rattle or drum? Anyhow I do apologise to students of any of the other lesser railways if I have caused offence.
But to keep to the subject, that lovely cab roof is a perfect —— to make, unless we press it out.
The tool I made for doing this is shown in Fig.14 and is made from hardwood. The thing to note is that the metal will wrap itself very nicely around any male contour, so all that is needed is a plug and shaped hole. The metal, brass, or nickel silver as in this case is heated to redness and dropped into water to anneal it. I hasten to add that it is the heating and not the water that does the annealing but the gas stove is usually close to the sink and the scouring powder soon brightens up the metal again!
If the draw required is a deep one then it is best to do it in two or three stages re-annealing the metal between each, for each drawing operation will re-harden the material.
If an open ended shape like the back of a firebox is required (Fig.15) extend the bottom edge to make a complete draw of it and remove the surplus after drawing.
While steel can be drawn quite easily it does require somewhat stronger tools than annealed brass, copper, nickel silver or aluminum.
Note: Anneal copper, brass and nickel silver as described above. For aluminum rub the surface of the sheet with soap and heat the underside gently until the soap turns black and quench immediately.
The rapidly increasing number of modellers using styrene sheet as a basic raw material will find all the foregoing apposite to their endeavours. To soften the plastic, hot water is substituted for fire, of course.